Monday, November 28, 2016

The Dress

We had a very busy week between Thanksgiving, family visiting, meeting our future daughter in law for the first time, and working on the muslin for Alex's dress. Amanda is delightful and we already adore her. She and Josh are perfect for each other.  It was a great week and our Thanksgiving was wonderful.  

Onto the dress!
I traced the pattern and made a muslin.  It was too small. To me my dd doesn't look any larger than she was when I took her measurements a couple of years ago.  Don't assume anything.  She has done a lot of climbing in the last couple of years and she has gained muscle mass and about 10 lbs.  Wider shoulders too.  I decided not to retrace the pattern, so boring and time consuming and altered the larger size and did a tissue fitting, at least of the bodice.  I ended up using a size 10 at the shoulders and upper body and enlarging to a 12 for the waist and a 14 at her low hip.  This is going by her upper bust, waist and hip measurements.  The alterations I made were a 1" fba, a sway back of about an inch and a rounded upper back, and I lowered the princess seam.  I kept a piece of narrow elastic tied at her waist to check the length and it made pinpointing her back issue easy.  I then made a muslin of the bodice and skirt, fitting the bodice and skirt separately before attaching the skirt.  I used the size 12 measurements to enlarge the skirt and didn't recut it.  It was too big as was the bodice at the waist.  Afterwards I realized that while I had lowered  the skirt waist to where her waist is, because we wanted to emphasize it, I forgot that, duh, the waist gets larger if you lower it 5/8".  Even if I had lowered it by folding out the 5/8" below the waist it would have been too big because it was meant to be above the waist, so larger to begin with.  I ended up taking in the waist and the upper hip curve.  She is straighter from waist to hip than Burda drafts the hip.  I also have to move the shoulder seam back a bit.  When she tried it on she found the neckline too high, and this has got to be the only time I've ever found a V neck on Burda to be too high! I pinned it under until she liked it.  I also cut the back V deeper.  The gored skirt is very flattering on her and she was happy.  The biggest issue I have is that she was instructed to bring a good bra.  What she considered her best bra was sorely lacking.  She will be back at spring break with good underwear and shoes!  Anyone know of a good lingerie store in Austin?  She says that she is willing to travel to Dallas or Houston so any suggestion will be greatly appreciated!

The bodice is  princess seamed with a gathered bias overlay and I am concerned that the princess seam won't have the correct placement because the bra wasn't good. Since the upper layer is going to be either chiffon or georgette I don't want to have to rip it.  I am thinking of hand basting the dress to make it easier to alter.  I will also cut wide seam allowances.

I sent for fabric samples from Emmonesock, Alex picked up some samples from Mood, and I just called Banksville Designer fabrics for more samples.  I made Alex's bat mitzvah party dress with fabric from them 17 years ago, long before internet fabric shopping. I wish that they had a commercial website, but if you know what you want they are a great resource for well priced, high quality fabrics.


These were taken before I lowered the neckline front and back.  She wants a 'hint' of cleavage.  There's  twirling going on in the last photo. Skirt perfect for it.  There will be a gathered overlay on the waistband that I left off.  Fitting this was a lot easier than I anticipated, these are pretty basic alterations that were easy to pinpoint.  
I've got some winter sewing for myself before I tackle her dress.  I need to get a roll of tissue paper too before I cut the dress.  Does anyone have a good source?

Monday, November 21, 2016

A Wedding Dress!


Our daughter Alex is getting married!  It's going to be here on Long Island next August.  We live in a very pretty area and we've got a couple of places to look at for the ceremony that are close to the house where we are going to have the wedding lunch.  Yes, I am going to make her wedding dress. She is here for the week and I am working on a muslin.  I sent her to try on dresses, one for style, and two for color.  Texas is not the place to find a simple dress.  If you want lots of bling, lace and lots of breast exposure you will be in luck.  This is not at all what Alex wants.  I found this Burda dress pattern that we both like.


Dress B, but long like A.  It's an odd waist placement, about 5/8" above the natural waist.  She has a tiny waist so I lowered it.  I almost never make Burda envelope, make that never actually. I do sew from the magazines and have for years.  The addition of some illustrations do not make the instructions much better.  It's very clearly shown in sheer fabrics, but there is no mention of lining the skirt and no amount to buy.  The bodice has a ruched bias upper layer over a princess seamed bodice that has a lining. All in the dress fabric.  As I mentioned, the skirt is not lined.  That's one revealing dress without a skirt lining!  Even if you make it in an opaque fabric a lining is really necessary to finish it.  I have done very little fancy dress sewing in all of my years sewing, but I have some very nice sewing books for reference which this pattern really needs.  

I have actually been doing some sewing, just not doing any photography.  I do have some things to show you.  Hopefully I'll get to it after Thanksgiving.  We're going to have a house full of company.  Our son is also coming with his fiance and our grandson!  So, both of our children will be getting married next year.  It's exciting. 
In case you are wondering, I am not making a dress for myself. This is a small wedding and the black and white silk I made for my cousin's wedding will do perfectly.  Thank goodness!

Have a wonderful Thanksgiving to my United States readers.  It's my favorite holiday.  

Friday, September 9, 2016

NYC Fabric and Bra Shopping

We were meeting cousins in the city for dinner and decided to drive in since it's often hard to get a convenient train in the evening.  Seth had a business stop to make and then we, or rather I, hit the garment district.  Seth sat in the car in a no standing spot just off 8th on 36th Street.  I wouldn't leave my car in such a spot, but his sitting there didn't seem to bother the two traffic cops who walked by and didn't stop talking.  
I bought some purse hardware at Botani since I have finally decided to make a leather bag. I took Don McCunn's class on Craftsy and it's time. I am going to  salvage a leather skirt I don't wear and maybe wore 3 times.   The pattern is Vogue OOP 7703 that I've had in my pattern stash for a very long time. It's copyrighted 2003.  I guess not everyone wanted or needed cell phone pockets 13 years ago.  There is one very small open pocket inside, it's use I have no clue.  The bag I'm making does have two outside pockets but I'll add a zipper pocket on the inside as well as 2 open pockets for my cell phone and a small notebook I carry.  Maybe a couple for pens and pencils or a large open pocket for my wallet?  I bought some black and ivory stylized animal print cotton at Mood for the lining. 


Fabric and hardware


Here's the pattern I using for the handbag.  Handbag A

I visited Elliot Berman  too, and bought an Italian double sided wool knit in an orange red on the outside for a cardigan inspired by this one from Eileen Fisher.  It's boiled wool, but my fabric will work.  Mine will also not have dropped shoulders which do not work for me.  I'm using McCalls M6844.  I'll add pockets. If you are in the city they have some gorgeous wool knits and what looked like a couple of Missoni knits. They also had a gorgeous wide stripe in red, white and gray from Prada. Or call and ask for some samples. There are so many more things in the store than they post on the website.  
I was looking for silk velvet for less than $40 in red and Meg McDonald   recommended Prime Fabrics on W 35th Street.  They had very nice silk velvet for $22 a yard, but not in the red I wanted.  Nor in any colors that work for me unfortunately. Not a must have so I didn't look further.


As to the bra shopping part of the day, Seth parked our car two blocks south of the Basta Pasta on West 17th off Fifth. Good and reasonable for a  nice restaurant in NYC. We were early and as he was walking up Fifth he passed a lingerie shop, Rigby and Pellier at 104 Fifth Avenue,  that had a nice display in the window.  We went in; (they have very comfy spouse chairs an important attraction for Seth). Lo and behold, gorgeous bras, in my size even, which turns out to be a band size smaller than I've been wearing and a cup size larger.  So a 36F instead of a 38DD.  A very good fitting by the well trained sales woman.  I look thinner, and I haven't had this much lift since I don't remember when.  It's also comfortable and stays in place.  Not cheap, but worth it for being pretty, fitting perfectly and being comfortable.  It's also been awhile since I had a really pretty bra.  So hard to find in my cup size. The cost of them would behoove me to learn how to make bras, but I resist.  
Here's a link Rigby & Peller

I just finished a pair of pants and next up is a last summer knit top.  Then on to the handbag. That and a few UFO's that will fit nicely in my fall/winter wardrobe.

As an addendum, I just saw Peter's post on Male Pattern Boldness that Paron, another small fabric store is closing. This is so sad.  I have been buying fabric from them since they were on 57th street, long before the internet.  They were a few doors down Greenberg and Hammer so it was almost one stop shopping for fabric and sewing notions.  When I couldn't get into the city I'd call and Lucy would send me samples.  I will miss them.  

Friday, August 26, 2016

Bet This Wasn't The Dress You Were Expecting


Bet this isn't the dress you expected to see, is it?
After sewing 2 muslins of Hot Patterns 1201 Montpelier dress I decided that it was not going to work for me.  I thought that I could make a very loose fitting dress into the semi fitted vision I had in my head and that I had drawn on my croquis.  I was running out of time and I still needed a dress for the Orthodox wedding we attended this past Tuesday, which is why I just didn't wear the black and white dress I wore to my cousin's wedding.  It was a Boro Park wedding and very traditional.  Ok, if you are knowledgeable about Jewish custom, you're saying,  scoop neck?  bare upper arm?  Well, by this point I really needed a dress and it wasn't all that immodest. No comments or looks were made, but the other dress, really not suitable.  This is from oop V2882 by Tom and Linda Platt that I'd made a few years ago. It was published in 2005.  Wow, I must have made this a lot of years ago!  I made this top  but not this skirt.  This pattern, unusual in designer patterns these days, has two different tops, two different skirts and a pair of pants.  I had made the knee length skirt before and it doesn't fit me. While the top did fit, I decided to make both pieces in the same fabric.  I made the long skirt which I love and I envision wearing it with boots and more casual fall and winter tops.  The fabric is fairly heavy so I got lucky it got cool that day and that the catering hall was freezing! 


Fabric: 6 yards of Rag and Bone acetate polyester lycra stretch crepe from Mood.  I already had 3 yards of this and since Mood still had  stock, I ordered 3 more yards.  I wanted a pair of pants out of it too, which is what I had originally bought it for.  I managed to cut out the top, skirt and pants.  The fabric true to crepe, drapes beautifully.  The only issue I have with it is the description on the Mood website.  I often find that their overly flowery, wordy descriptions don't really give me the  information I need to understand if the fabric meets my needs, and this was true here as well.  It was described as 4 way stretch, or stretch in length and width. If I hadn't checked to make sure that it had the required stretch for this pattern I would never have realized that there was minimal stretch in the cross grain, and the required stretch was in the length. I ended up cutting it in a single lay on the cross grain.  

Changes made:   The top pattern was already cut out in size 14.  I use a 16 these days, which was in the pattern, but I stupidly didn't re draft it back to a size 16!  I had tried on the previously made top, which was made up in matte jersey.  Thinner, and maybe a bit more stretch. Anyway, I ended up lowering the underarm and using up about 3/8" of my extra seam allowances in the body and sleeve. Fortunately, I always use a 1" seam allowance to side seams.  The top calls for side seam slits at the hem, but I didn't find that they were flattering so I left them out.  The top also calls for a cb invisible zipper but I had enough room to leave it out.  I made a few minor fitting fixes, especially narrowing it at the front chest.  

Because I am larger than a size 16 on the bottom I added about 6" to the hip and waist. This pattern has 9 gores with 2 in the front.  I love skirts that have different size and shapes to the gores and this one works beautifully for me.  I don't find A line skirts flattering, but this fit and flare skirt works for me. The other big issue I had was getting the hem to be even without ruining the flare.  I know, I should have made a muslin but I didn't.  I could have actually marked the waist when I tissue fit this, but again, I didn't.  I have a very uneven waist, with the front waist needing to come down a good 4 inches.  My left hip is lower and shaped differently than my right side; the back was fine just where it was.  I stood on the stair landing(great stand in for a fitting platform) with a 1" wide elastic that I use for fitting with a velcro fastening,  while my dh sat a step lower and he measured from the floor up as I pulled the waist up above the elastic.  When the hem was level he marked the bottom of my elastic.  It worked really well.  I did however, need to really take the waist in and re shape the upper hip.  Lots of fit as you sew went on.  
When I enlarge bottoms of multi size patterns I usually add only at the seams that change size.  I decided that it was too much to add at each side seam so I added about a 1/4" at all of the other seams except the cb.  

There is an invisible zipper at the cb. The pattern called for a narrow waistband that met at center back with a hook and eye fastening at the waistband. I hate having a hook and eye that doesn't have any backing against the skin; it's uncomfortable.  Instead I made a version of my pants waistband with a petersham facing and overlap with a heavier pants hook and eye. It's flatter and much more comfortable.


Monday, July 11, 2016

Finally Figured Out How to Make an FBA In a Dior Dart!

I knew I had seen how to alter a Dior dart somewhere, but I combed my fitting books, and I have a lot of them!   Could not find it anywhere.  Finally this post from from Cenetta of The Mahogany Stylist on how to make an fba with the new or newish, Y dart made me remember that I hadn't looked in Palmer/Pletsch's Full Busted DVD, which is where I found it.  I've also been playing around with moving darts and dividing my very large dart into multiple darts. It's fun and kind of empowering not to be tied to that very large dart my DD bust needs.


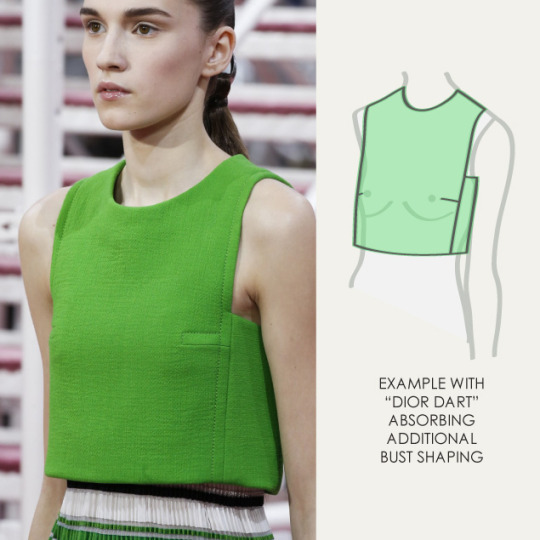
In case you don't know what a Dior dart is, it's a short dart from a side panel. Burda often uses them and Hot Patterns used it for their new Montpelier dress which I am making.


As you can see, this dress has a side panel which extends as the under sleeve for this dolman sleeve, if that's what you call this cut on sleeve?  But, regardless It has a side panel with a dart in the front panel. The side panel is far from the bust apex.  A princess seam would run over the apex or close to the apex of the bust.  Here is an example of how Dior used it in the 2015 Spring collection. 


I love this example with the top stitching.  I turned my single Dior dart into two to make them smaller.  Jennifer Lawrence had a dress on  that had three small darts from a side panel that was very attractive too. It really molded the bust beautifully.

My alteration of the Montpelier dress looks like this, showing how  I've divided the dart into two, but I am going to make two front versions one with one dart and one with two as it is here to see which I like better.  I also shortened the dress since this is a very awkward length on me, to just below the knee.

Here's  the Y dart I made. Because I have a low bust I made a smaller Y section, about 1/2" with the remainder, about 1" in the side dart, because it widens the upper chest  where I am not wide.  The sleeve gets cut off in this type of sleeve so that you can make the second part of the fba like you would in a regular armscye. Then it gets re attached and any opening filled in with paper.  This is smaller than the usual fba I make.  But, when I tissue fit it this is the width I needed.  It remains to be seen if this sews up well in a muslin. 


Sunday, July 3, 2016

Why Do I Only Seem to Finish Winter Coats at the End of the Season?

Seriously, I never seem to finish a coat at the beginning of the season. I dither about the  pattern, I make at least two muslins after numerous fitting alterations.  I play with the details.  It's a  time consuming process.  This coat is my all time favorite of  coats that I've made. The fabric is a gorgeous mohair, wool and silk blend that I've in the collection more than a few years.  It was bought at one of Michael's online 50%off  sale .  If I remember correctly it's Zegna. It's fabulous. The mohair and silk make it light and airy while the wool gives it stability.  The lining is a silk charmeuse from one of  Fabric Mart's famous sales.  My inspiration was a Saint Laurent coat selling for over $2500. I had a Burda pattern that I'd made a muslin from. for a round necked coat. . I liked it because it had a shoulder princess line in front and a plain back.  I wanted a slightly oversize coat that would fit comfortably over a heavy sweater or two, and it does.  I've taken all of Suzy Furrer's classes, which are fabulous by the way, and used her neckline and collar class to change the plain front to a notched collar.  I change necklines, especially in knits, all the time but this was my first notched collar  and I am very pleased with it.  

I love  simple coats with something different that makes them stand out and here it's the oversize pockets.  I made several paper samples and I still ended up making them twice.  The coat also has bound buttonholes, my go to for coats.  I hadn't made them in awhile, so that meant lots of samples with some different methods. Judy Burlap's bound buttonhole instructions, available on her website, are some of the easiest, best I've used.  I made three buttonholes that  match and all of the lips are even. 

When I plan a coat I debate endlessly with myself about how much tailoring structure I really want in the coat.  For this one I wanted a light soft look and feel because the fabric is airy and light.  Allison Smith's class on Craftsy gave me the opportunity to try hybrid tailoring.  It's light but gave me just enough body for this coat.  I think that I am addicted to Craftsy classes!

 All in all I am very pleased with the coat, especially the fit.  I finally got the armscye and sleeve fit perfected.  I have a low right shoulder that has a bit different rotation than the left one due to an old injury, so while the left one will hang perfectly, the right one is a different story.  I learned that I need to rotate it more than the left one.  I also learned that my narrow shoulders need a higher sleeve cap. to hang perfectly. This I got from another Craftsy class, Lynda Maynard's fitting class.   I've had the shoulder problem for 34 years but age has changed it as it has the rest of my body. Learning to fit my aging body has sometimes been a challenge.


 Do you ever find that you have more ease in the front or back of a sleeve cap?  This
was one of  my problems.  I could feel the back of the cap against my shoulder.  The sleeve cap ease needed to be balanced.  I walked the front and back of my sleeve against the front and back of the coat armscye.  When I got to the shoulder point I marked it on my sleeve cap.  The ease needs to be the same on either side of the shoulder point on the sleeve cap.  I adjusted it by removing from the front and added to the back of the cap.  It really works.   I found this information in Sarah Veblen's Photographic Guide to Fitting.  I keep finding more and more useful information in that book. Because of my shoulder issue I still had to adjust the right sleeve cap a bit more than the left. It worked and as you can see in the photos there is no excess at the back or front of my cap. It's fits into the armscye perfectly.  The back of the coat looks a little big, but this is exactly how the original looked and it makes it easy to wear over heavy sweaters.  Here I'm just wearing it over a t shirt. 

The other thing I do to accommodate my uneven shoulders is to add to my right shoulder pad. I add padding and keep trying it on until both shoulders look even.  Then I use some tailor tacks to keep the layers together.  


I usually start with existing shoulder pads, especially if I want to use extended pads which are not easy to make yourself.  Apple Annie fabrics has some very nice shoulder pads that are a combination of set in and raglan. Years ago Threads had a series of articles on Armani tailoring and this is the  type of shoulder pad he uses.  Because my low point is really that my arm is lower, this really makes it easier to even up my shoulders. I add the padding to the end of the pad but not into the extension.  As you can see, it works well. It also fills out the sleeve cap. I didn't use a sleeve head.
The photos we took that showed the lining weren't great, so when I get a chance I'll take some new ones and post them.  


Thursday, June 16, 2016

Color

Color, as you can see I haven't quite succeeded in adding a lot of color to my wardrobe. I do wear red lipstick, which I've done for years.  The current color is Beso by Stila. I love this stuff.   Red lipstick is usually high maintenance but this one doesn't come off all over the place. Well, some of it does come off when you eat.  Oily foods are the worst.  But it doesn't come off in the usual course of the day and it stays on all day.  I  have added  other accents of red to my wardrobe; a red everyday handbag, red glasses, red sandals.  These are big steps for me. I've got a red pashmina too, as well as a black and red silk scarf I bought in India years ago.  I've been using them more.  

Seamwork, the monthly magazine from Colette patterns posted an article on how to find your colors.  I downloaded the recommended Sherwin and Williams app.  I took selfies of myself and ran the program.  Problem is, I didn't like most of the colors.  I don't wear pastels.  Can you really imagine me in pastels?  I can't.  There were lots of grays and some black as well as a number of different reds, yellows and golds.  These are colors I can relate to. I already have plenty of grays and blacks  in my wardrobe.  Big step for me, I ordered a red and white stylized floral for another Gypsy top.  I've got a nice gold rayon knit in the collection (thanks Caroline; a much better word than stash!) that will work with my gray, black and white neutrals. I also ordered a coral, gray and ivory knit from emmaonesock to go with gray or white pants. I have three pairs of gray pants and I'm making a pair of white linen pants.  I've got some red linen that would look pretty as a summer woven tee with white and gray and my multitude of black pants.  Baby steps for the color.  Oddly I did make some pieces a few years ago with more color but they are gone from my wardrobe due to stains or relegated to exercise clothing due to wear. 


Wednesday, June 1, 2016

Big Style


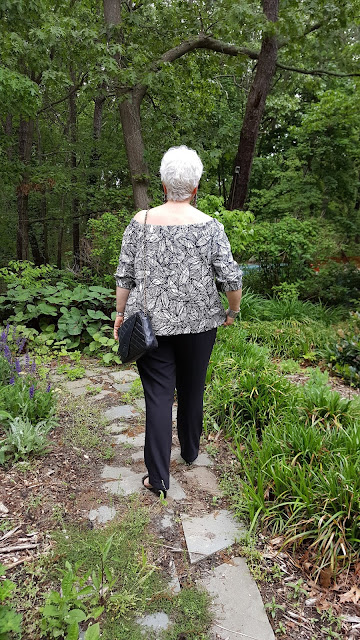
As you can see above in Bill Cunninham's Sunday NY Times offering,  off the shoulder tops are very much in vogue right now. and there are lots of ways to wear it. I finished a blouse version of Hot Patterns Urban Gypsy Friday and wore it out to dinner with friends.  This top is in a lovely black and white stretch cotton from emmaonesock and probably as old as the fabric I used for  my dress!     Every season I make a list of sewing projects and a blouse is usually on it and until now hasn't made it to the sewing machine.  


This version uses the alternate sleeve that comes with the pattern.   It's quicker to do well, no baby hem. It's still not the original version with it's shirt tail hem.  One more would be nice, using the tie sleeves, and the original hemline.   After all, I bought a strapless bra for my dress and I wouldn't mind getting a little use out of it!   

I really enjoyed working in a nice woven cotton instead of my usual knit tops.  Knits can be finicky, and this was not in the least.  the only issue I've have with this top is that I made the elastic too short to stay further down on my arms. I think I may open it up and put longer elastic in. it's a fine line between too long and not long enough!  I would ere on the longer side if you make it.  I didn't really notice it until I sat in the car.  Because of the seating angle I think, the shoulders rose. 
One of the reasons I bought this pattern was how current it is.  But, I am not a big fan of over sized shirts or anything else for that matter.  This shirt has too much ease as drafted in my opinion.  I carefully measured the hips and even at a size smaller there was 8".  I of course then added an fba and made it worse.  It's also totally straight at the side seams. When I altered it to make the dress, in addition to narrowing it I shaped it at the side seams, in at the waist and pegged the hem a good inch on each side. I do have to shimmy into the dress a bit to get it over my hips, but it's fine once it's on.  I have to keep saying that if you are making a muslin  add Horizontal balance lines.  I could see that the one for my bust was pulling down at the sides, so I added another small dart to level it out.  I rotated it into my existing two darts and then equalized the two darts.  I almost didn't see it, but after spending a long time looking into the mirror I realized what the problem was.  Finally learning to see after all these years!

I have a number of shirting fabrics in my stash for that planned shirt that never materialized.  I saw a gorgeous white cotton and  linen shirt from The Row in Elle magazine that I would love to replicate. (of course I have several whites to choose from) It has a large notched lapel and collar.  The Row's shirt wraps, but I'd probably add some buttons and a bit more shaping.  Now to find a pattern, or maybe I'll finally  draft it myself.  I've taken all of Suzy Furrer's drafting classes and several in person from Kenneth King.  I have Kenneth King's cd books, but I found Furrer's classes easier to understand.  I drafted a notched collar and lapel for a coat I made in late winter.  I tried to draft it using KK's book and couldn't get what I was looking for, but I did using Furrer's class and it came out exactly what I wanted.  I'll write a future post on the coat.  I love it and it's probably the best coat I've ever made. 

Monday, May 23, 2016

I'm Back

I never intended to take such a long break from blogging but time creeps up on you.  I thought about not continuing but in the end I've missed you all.

We had a wedding to attend on Sunday and I needed a dress.  I have such a difficult time finding dress patterns for my aging body that are stylish but not too exposed. That make me feel chic and not dowdy.  My arms have seen  better days but my shoulders are still fine. When I saw Hot Patterns Metropolitan Urban Gypsy Blouse I bought it immediately not thinking about making it into a dress for this wedding but thinking that it was a chic top I would wear all  summer.  Looking for an idea for a dress I looked at my favorite fashion sites and kept coming back to dress versions of this top.  I drew a couple of different dresses on my croquis and sent them to my daughter. She immediately picked the off the shoulder one. I am so glad I took her advice.  Two muslins were necessary to work out changing this to a dress and some fitting details, but it was really easy to get this to fit me.  It's a good pattern. There was too much ease even though I made it a size smaller.  I rotated the fba I made into the neckline so that I have 4 darts now in front instead of two.  Not having gathers was a big plus for me in this pattern.  Darts much more flattering to my large bust than gathers above it.  In all I think I took out about 4 "in the waist and hips. Instead of being straight the side seams now curve in at the waist and I pegged the bottom.  There was still plenty of room for the back gathers to fall gracefully.

Everything for this dress was from my stash. The print is a silk crepe de chine that was wonderful to work with.  It stayed put on my cutting table, the print was on grain and it's just great quality and a nice weight. I bought it on clearance sale from a pattern designer who was phasing out fabric and I can't think of who it was. I had 4 yards and used most of it including two samples to practice the narrow hem that I haven't done in years.  Of course I could have just used scraps but I wanted to see how hemming the opposing curves would work.  The original does not call for lining but it does have instructions for putting in a shelf bra, which I used to a point. My lining isn't stretch, it's one of the nicest Bemberg rayons I've ever worked with. It's heavier than what I see now. It was also on sale from a website that closed.  Can't remember their name either; both pieces have been in my stash for a good long time!  I attached it at the neckband and I finished the armscye openings tacking them at the underarm seam and French tacks at the lower seams.

 I used French seams for the top of the sleeve which I didn't line. Even though I lined it I  finished the side seams with my serger because of raveling.
We had to drive almost two hours to get to this wedding and I was sure I would be a mass of wrinkles by the time we got there, but there weren't any and after a whole day and more than two hours to get home there still weren't very many wrinkles.  If you ever think that you don't want to bother lining something, remember my wrinkle-less dress and think again.  I do think that the weight of the lining helped. 


I love this dress!  Was it Donna Karan who said that the last thing to go are a woman's shoulders?  

Trudy of Hot Patterns designed a fantastic pattern that's exactly  what's being sold all over the place in RTW.  I am in the process of making it in blouse form, also in black and white, but cotton.  It's a top, or in my case a dress that I think can be worn by almost any  woman. For once I'm thrilled with what I wore to a wedding. I'm also happy with my sewing. I make so many really simple knit tops and simple pants that I felt like I was losing my sewing skills. This, while not a particularly difficult dress,  was more challenging than my usual fare.